The Instagram Features and Outside Apps You Should Use to Make Your Photos Look Amazing


 Sometimes people get a little lost when it comes to editing their photos so that they are beautiful and ready for Instagram, so I want to provide some tips based on how I edit my own photos. While I am not a certified editing expert, I have had a lot of experience with editing photos through my own personal use of social media, and as the admin of the Tripleseat Instagram account.
I want to start by saying there are a few basic and quick steps to consider while capturing photos that will help in the editing process later on.
Find good lighting
Yes, apps can lighten up a photo drastically, but it is always easier and the most natural-looking if the lighting is great in the first place. This may mean staging your photo outside, moving to be in front of natural light by a window, using flash when the room is too dark, or tapping the iPhone screen before taking a photo to make sure the main subject in the photo is clearly in the good light.
Consider the angles
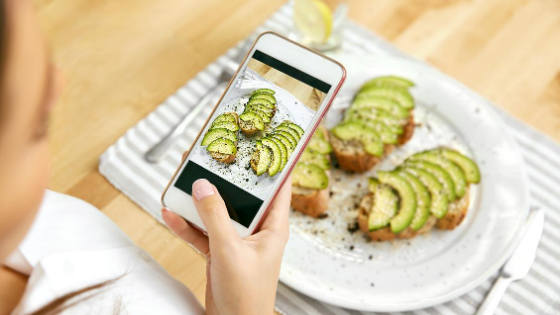
There is definitely such a thing as “good” vs “bad” angles, no matter if you’re photographing people, objects, or physical spaces. When capturing people, consider if you want a full-body pose or close-up and if the photo is a group picture or single shot. These details will also influence if you take a horizontal or vertical image. In my experience, a close-up single shot will look best horizontally. When photographing food, consider what else will be in the shot depending on how you angle the camera. For example, it may look cleaner to simply have the plate of food on a table opposed to including other distracting objects (cups, napkins, hands) in the shot.
Seek out backgrounds
A great photo can be taken in a light or dark-colored background, but if you are interested in keeping a certain “theme” or “look” to your Instagram page, finding consistent backgrounds could help you do this. Some feeds feel aesthetically pleasing to the eye because of the fact that they keep consistent colors throughout. Backgrounds in the restaurant industry may include table tops, bar settings, outdoor seating, scenic “Insta-worthy” backdrops, and event spaces among other locations.
Use apps to edit your photos
Now for the actual editing process. When I edit my photos, I mainly use the app VSCO. It is free in the Apple App Store, Google Play, and the Samsung Galaxy Store, with the option to purchase extra features. I am able to accomplish everything I need with the free version. There are many other editing apps that I have tried over the years and are also great, including Afterlight, Adobe Lightroom, and Prequel to name a few.
When I edit, I like to make the colors in my photos pop, the images look sharp, and the photos feel warmer or colder, depending on the color scheme in the image. Take a look at the video below to watch me use VSCO to edit a photo that was posted on the Tripleseat Instagram account.
Once I have edited the photo to my liking in VSCO, I bring it into Instagram all ready to post. I create a caption based on the goal of the photo, tag a customer venue or individual as needed, add a location, and choose hashtags. Pro tip for Instagram captions: Instagram does not let you create a line break when you’re inside the app writing a caption, so if you write your caption ahead of time in this app, you can paste it into Instagram and the line breaks will hold. I use this to create space between the end of my caption and the beginning of my hashtags, or if the caption just looks cleaner with extra line spacing. Voila, your Instagram pic is ready for the feed!
More resources
Now that you have a better understanding of the editing process to prepare photos for Instagram, check out the latest episode of Tripleseat’s podcast Two Chicks, Three Seats, which dives deep into the ins and outs of using Instagram at your restaurant.